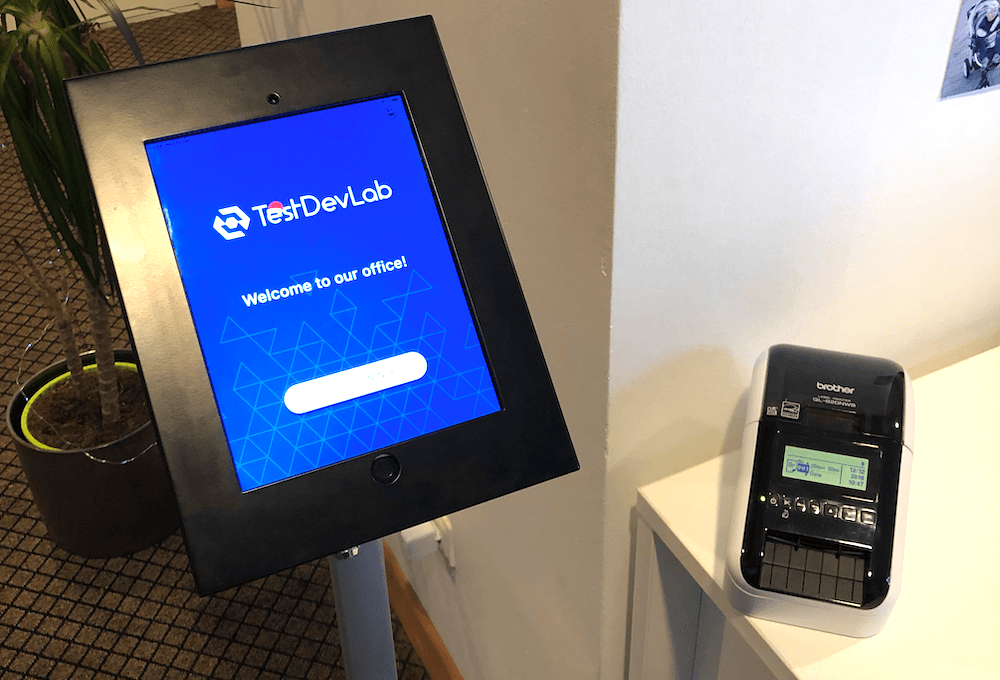
Our team is constantly growing and we often welcome guests in our offices. At some point a need of distinguishing who’s our employee and who’s a visitor arised and we started looking for possible solutions that can help. We found some visitor registration services online, but after a quick assessment of their features we decided to build our own solution. How hard can it be?
We created a Ruby on Rails system with beautiful dashboards, an API and an iOS application that we put on an iPad and left by the office entrance in a stand.
Now our office administrators can log visits and see statistics. Every visitor has a badge on their chest with their name, purpose of visit and host. Also we can be sure that every visitor with a badge has signed our NDA.
To make this solution, we tried few network printers but really wanted to use just Bluetooth for printing and did not want to rely on network connection. Different printer sizes were considered as well. So we found a perfect fit for our case – Brother Bluetooth series label printers.
In this post I will show how it is possible to use Bluetooth printers from your own iOS apps. What libraries/frameworks are available and accessible for iOS developers and what specifically you need for Brother Bluetooth label printers.
Printing from iOS with AirPrint
We can almost always find a print option under the share button where it has been implemented. And in this way it’s possible to print from iOS device’s images, documents, web content etc., if it has been connected to a printer.
In UIKit we can find controller named UIPrintInteractionController. And that is, by the documentation, a printing user interface that manages the printing of documents, images, and other printable content in iOS. This controller uses AirPrint printers.
Nowadays many printers support AirPrint. You must be on the same network with the printer to be able to use it from iOS device.
But what if your printer is not on the supported AirPrint printers list, but still has wireless printing option? Then you probably connect your iOS device to printer’s Wi-Fi and then print your content using some third party apps. For example, for Canon printers or for Brother printers and for label printers.
Printing from your own app with AirPrint is easy!
It’s built-in in the UIKit Framework and very well documented, too. And there are many useful online guides available.
Short example in Swift shows how it is done:
// UIPrintInteractionController presents a user interface and manages the printing
let printController = UIPrintInteractionController.shared

// UIPrintInfo contains information about the print job
let printInfo = UIPrintInfo()
printInfo.outputType = .general
printInfo.jobName = "myPrintJob"
printController.printInfo = printInfo

// You can also format printing text, for example, the insets for the printing page
let formatter = UIMarkupTextPrintFormatter(markupText: "TestDevLab blog 2018")
formatter.perPageContentInsets = UIEdgeInsets(top: 90, left: 90, bottom: 90, right: 90)
printController.printFormatter = formatter

// Present print controller like usual view controller. Also completionHandler is available if needed.
printController.present(animated: true)
When print controller is presented, the user sees view where he/she can select printer, number of copies and other printing options, if available.

What about Bluetooth?
If you have chosen to deliver content from your device to printer using Bluetooth, you still can use the same printer select and print details view provided by Apple. There is no difference in terms of user experience.
Let’s look at badge printing via Bluetooth using Brother label printers
Brother has their own SDK for iOS devices, available here. And Envoy has a nice public pod setup for this Brother Print SDK, available here. It’s called BRPTouchPrinterKit.
This includes everything to make printing with Brother label printers via Bluetooth easy.
How to use BRPTouchPrinterKit
First, we need to connect the device. Open settings and connect to your Brother printer through Bluetooth. Once it is done, we can get to the code.
You can see all paired devices using:
connectedDevicesList = BRPtouchBluetoothManager.shared().pairedDevices() as? [BRPtouchDeviceInfo] ?? []Let’s select first device because in normal workflow, there will be just one.
let printerInfo: BRPtouchDeviceInfo = connectedDevicesList.firstThis paired device info contains printer model name, which you must provide to initialise BRPtouchPrinter instance and serial number that is needed to set it up.
let printer = BRPtouchPrinter(printerName: printerInfo.strModelName, interface: CONNECTION_TYPE.BLUETOOTH)

printer.setupForBluetoothDevice(withSerialNumber: printerInfo.strSerialNumber)
Next, we need to create BRPtouchPrintInfo with printing options we want, for example,
let printInfo = BRPtouchPrintInfo()
printInfo.strPaperName = "62mmRB"
printInfo.nPrintMode = PRINT_FIT
printInfo.nOrientation = ORI_LANDSCAPE
printInfo.nHorizontalAlign = ALIGN_CENTER
printInfo.nVerticalAlign = ALIGN_MIDDLE
printInfo.nDensity = 10
printInfo.nSpeed = 1

printer.setPrintInfo(printInfo)
You can see BRPtouchPrintInfo header and its properties here.
All paper names that you can use, depending on your label’s paper size, are the following:
62mm
62mmRB
17mmx54mm
17mmx87mm
23mmx23mm
29mmx42mm
29mmx90mm
38mmx90mm
39mmx48mm
52mmx29mm
62mmx29mm
62mmx100mm
60mmx86mm
54mmx29mm
Once all above is setup, we can check if our printer instance is ready by calling:
printer.isPrinterReady()If our printer is ready, start the communication and print, for example, an image:
if printer.startCommunication() {
    let result = printer.print(myUIImage.cgImage, copy: 1)
    if result != ERROR_NONE_ {
        print ("🖨 Printing Error!")
    }
    printer.endCommunication()
    print("✔️ Successfully printed badge")
} else {
    print("🖨 Printer Communication Error!")
}
That’s it! If everything was setup correctly, the label with your image should be printed out!
And one more thing…
You can also get notified when Brother device is connected or disconnected by registering for BRDeviceNotifications, like this:
    BRPtouchBluetoothManager.shared().registerForBRDeviceNotifications()
        NotificationCenter.default.addObserver(
            self,
            selector: #selector(accessoryDidConnect),
            name: NSNotification.Name.BRDeviceDidConnect,
            object: nil
        )
        NotificationCenter.default.addObserver(
            self,
            selector: #selector(accessoryDidDisconnect),
            name: NSNotification.Name.BRDeviceDidDisconnect,
            object: nil
        )
And the selectors:
@objc func accessoryDidConnect(notification: Notification) {
        print("🔔 Notification: accessoryDidConnect")

        if let connectedAccessory = notification.userInfo?[BRDeviceKey] {
            print("🤝 Connected Device : \(String(describing: (connectedAccessory as? BRPtouchDeviceInfo)?.description()))")
        }
}

@objc func accessoryDidDisconnect(notification: Notification) {
        print("🔔 Notification: accessoryDidDisconnect")
}
Let’s sum up
Printing via Bluetooth does not look so hard anymore if you know that there are similar SDK’s for specific devices like the one above. It just takes a little time to find some kind of documentation and you are ready to experiment and test them.
It’s also really cool that we have projects like these with new challenges and functionalities where we can always learn, research and at the end, be happy with the progress that we have achieved!
I hope you took the most out of this article and it somehow helps you to achieve your next goal faster. Happy coding!


